The importance of Accurate Tracking in Digital Advertising AKA Good-Bye Cookies 👋😭
Privacy changes from more and more restrictions on user data collection and the use of personal data means the quality of your first-party customer data is going to be key to your tech company’s future marketing success.
Tracking identifiers like third-party cookies, device IDs, and UTMs will gradually disappear thanks to the latest series of user privacy updates (I’m looking at you iOs17).
This is where Enhanced Conversions comes in.
What are Google Ads’ “Enhanced Conversions”?
Enhanced conversions are Google’s answer to third-party data depreciation and the need for better first-party customer data. The feature enhances the accuracy of conversion data while still meeting consumer privacy regulations.
Google uses a patent method SHA-256 (Secure HAsh Algorithm 256 bit) to encrypt customer data uploaded into its ads platform and assigns code numbers to those data fragments that can’t be reverted back.
This means that the solution operates optimally when Google can correlate the uploaded customer information within their existing accounts, which would require the users to be logged into Google.
This also means that there is a level of data modeling that happens when the observable data gathered through first-party conversion data uploads can’t be matched. Google leverages the behavior of observed groups to predict the behavior of unobserved groups, all without identifying specific individuals.
The Benefits of Enhanced Conversions
Enhanced Conversions need to be implemented sooner rather than later. Failing to do so will leave advertisers’ ad accounts with no conversions recording, zero attribution, and operating budgets in the dark.
By implementing Enhanced Conversions, you’ll see:
- Increases in your conversion observability by recovering lost conversions and observing the net new conversions through first-party conversion data.
- Better modeling and overall conversion reporting since improved observability will allow Google’s conversion modeling to be more accurate, aka higher data accuracy.
- Improvement in bidding and attribution since better data is being ingested by bidding models such as tROAS/ tCPA and attribution models (DDA).
- Improvement in performance with higher ROAS, better CVR, lower CPA, and statistically significant outcomes in incrementality studies.
But I Have OCT, What Makes Enhanced Conversions Implementation More Efficient?
Offline Conversion Tracking (OCT) is NOT a complete solution for Enhanced Conversions. While OCT does help improve observable data and align CRM performance by using GCLID (Google Click ID), it also requires us to modify lead forms or CRMs to store GCLID.
The enhanced conversions for leads solution takes away the need to do this modification and utilizes the first-party data provided to measure sales and transactions that happen off the client site.
This solution will be more compatible with new features that would come out in reaction to more privacy laws or restrictions.
How Enhanced Conversions Google Ads Work
There are two layers for Enhanced Conversions:
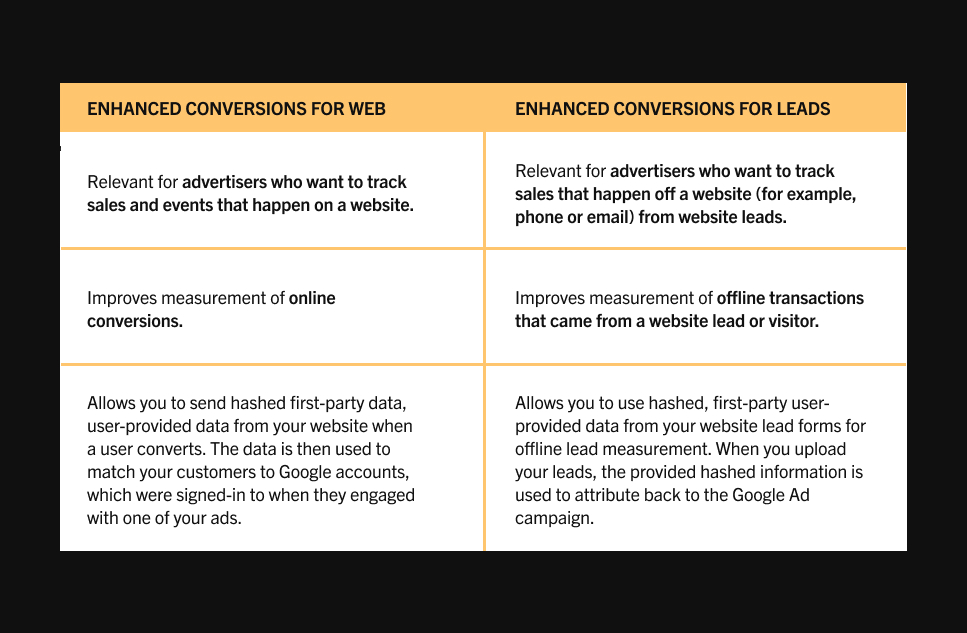
Enhanced Conversions for Web
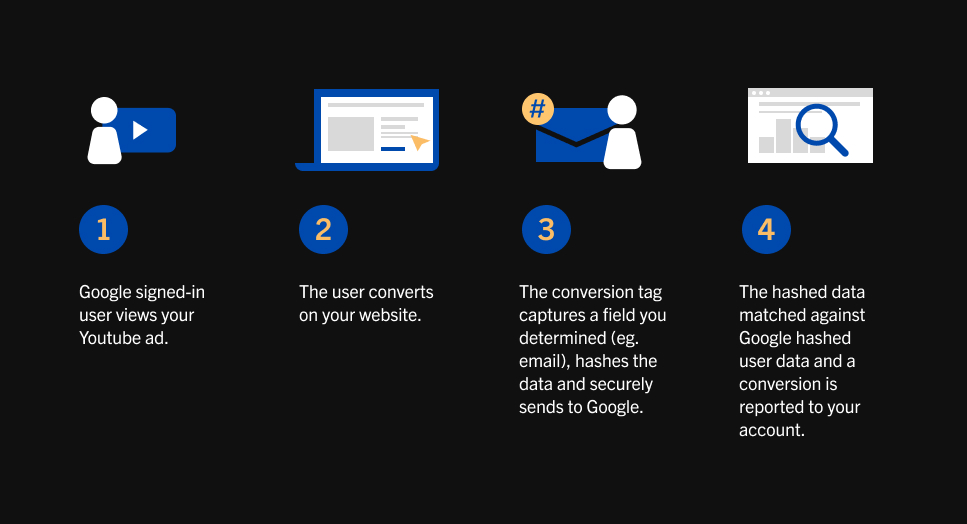
- Sends hashed first-party data from your website when a user converts through form fills, purchases, etc. The data is used to match the customers to Google accounts that were signed-in when they clicked the ad.
- Doesn’t require any upload of data.
- Can increase reported conversions that were missed due to browser restrictions on cookies and improve the measurable conversions.
- Adopted accounts have experienced a 5% increase in their conversion rates for Search and a 17% increase in conversion rate forYouTubee.
Enhanced Conversions for Leads
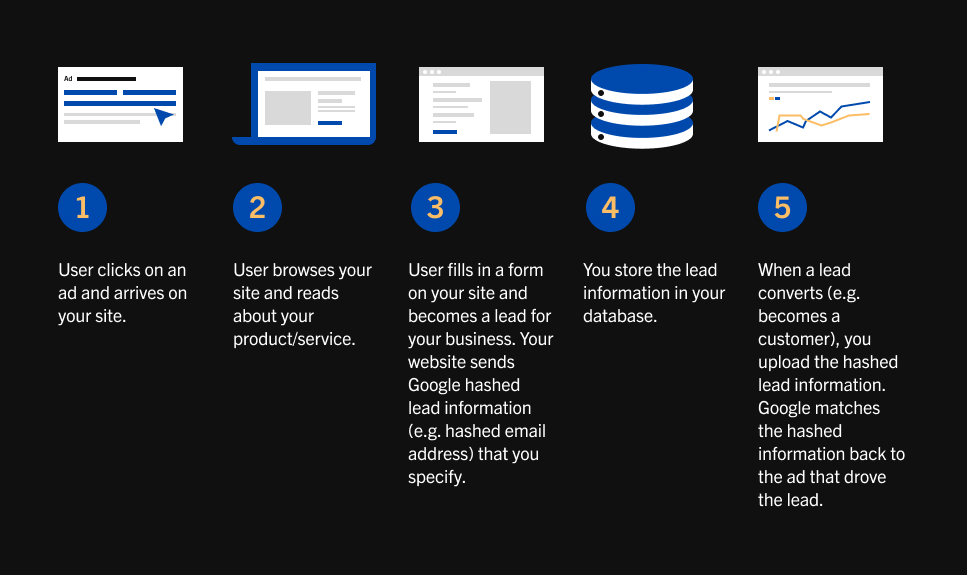
- Works with offline conversion data such as qualified leads or converted leads from CRM.
- Allows you to use hash, first-party data from your website lead forms for offline lead measurement. When these leads are uploaded, the provided hashed information is used to attribute those back to your Google Ads campaigns.
- Doesn’t require you to modify the lead forms or CRM systems to receive a Google Click ID ( GCLID).
- Should be set up with scheduled uploads at a regular cadence with Google Sheets (eventually there will be API integrations with Salesforce or Zapier).
Preparing for Enhanced Conversions Setup
The Three Prerequisites of EC for Web:
- Sitewide tagging
- Google Ads or SA 360 as a conversion source
- Customer data submitted on page
The Three Prerequisites of EC for Leads:
- Sitewide tagging
- Auto-tagging enabled Google Ad account
- Customer data submitted on page
How to Implement Enhanced Conversions
Step By Step Guide on How to Implement Enhanced Conversions for Web
Enhanced conversions for web can be set up in three different ways – through Google Tag Manager (GTM), the Google Tag, or Google Ads API. Since most are set up with GTM, we’ll show you how to do that one specifically:
Click on “Tools & Settings” in your Google Ads account.
Click on “Conversions”
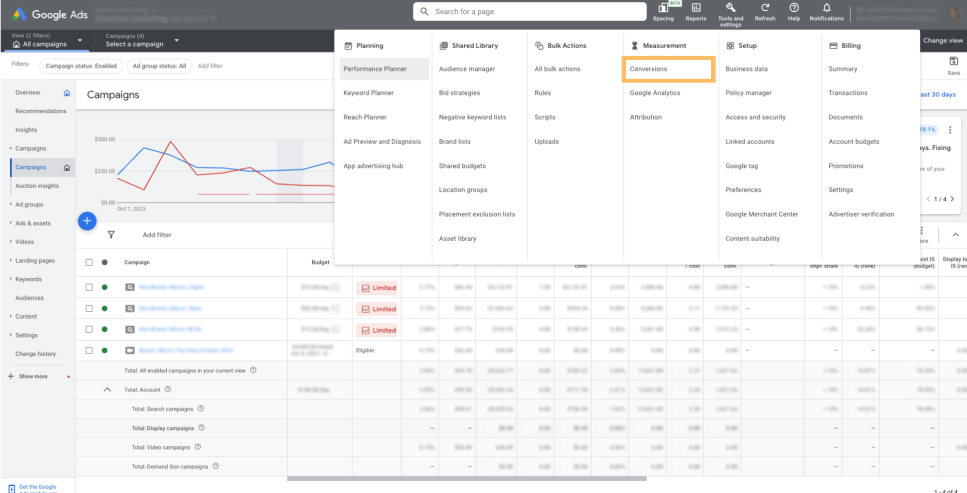
Click on “Settings”

Expand the “Enhanced conversions” panel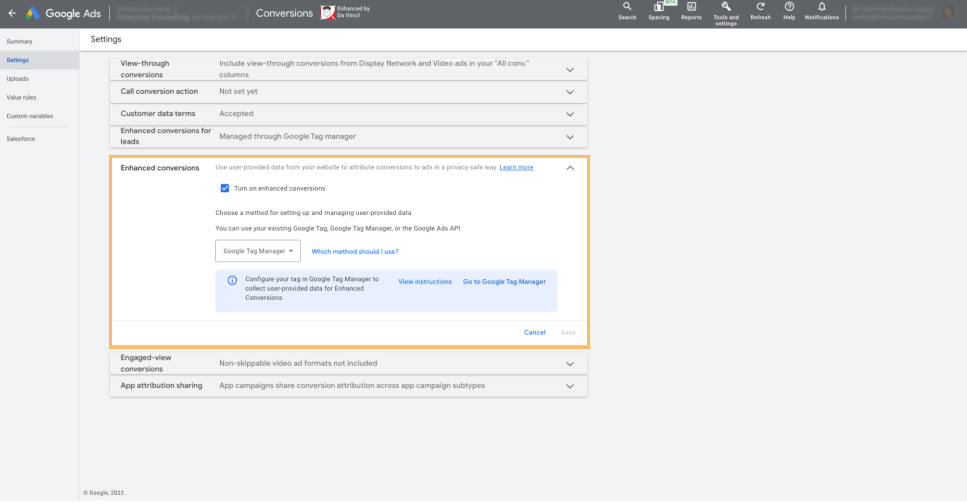
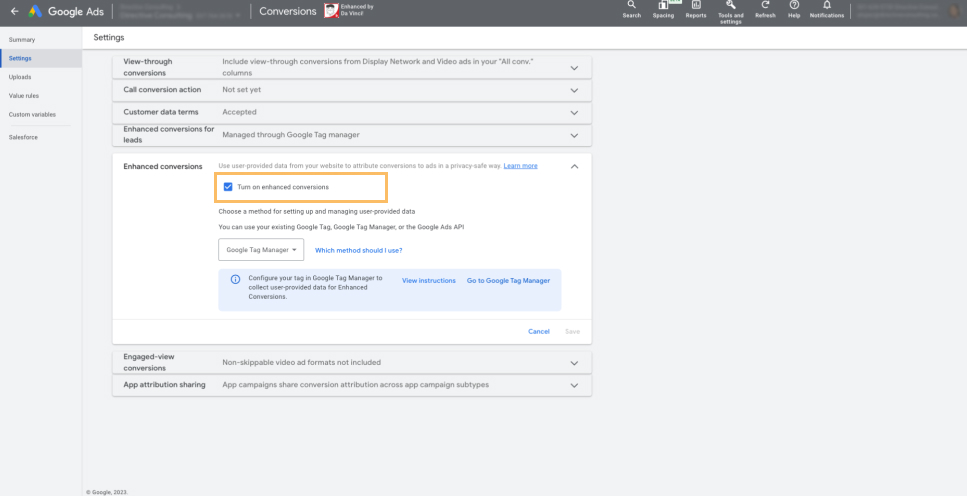
Check on “Turn on enhanced conversions”
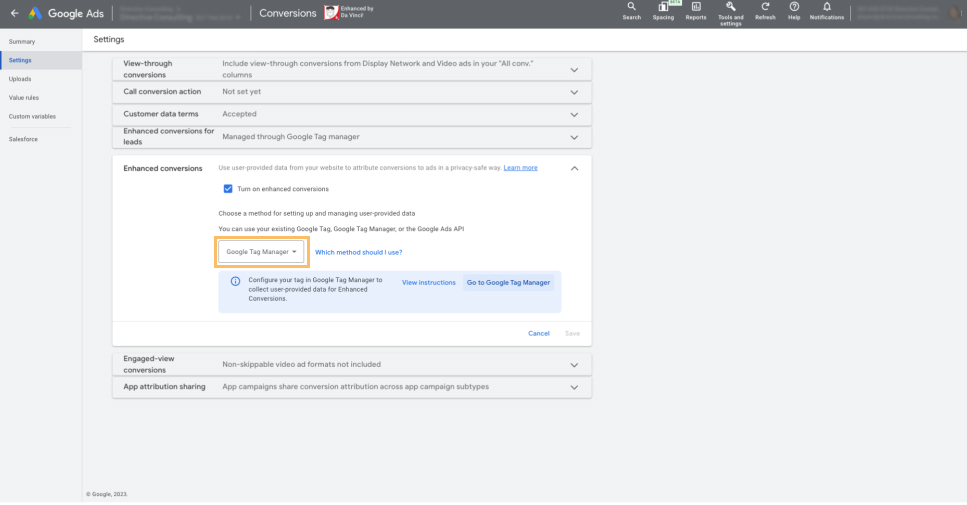
Select “Google Tag Manager”
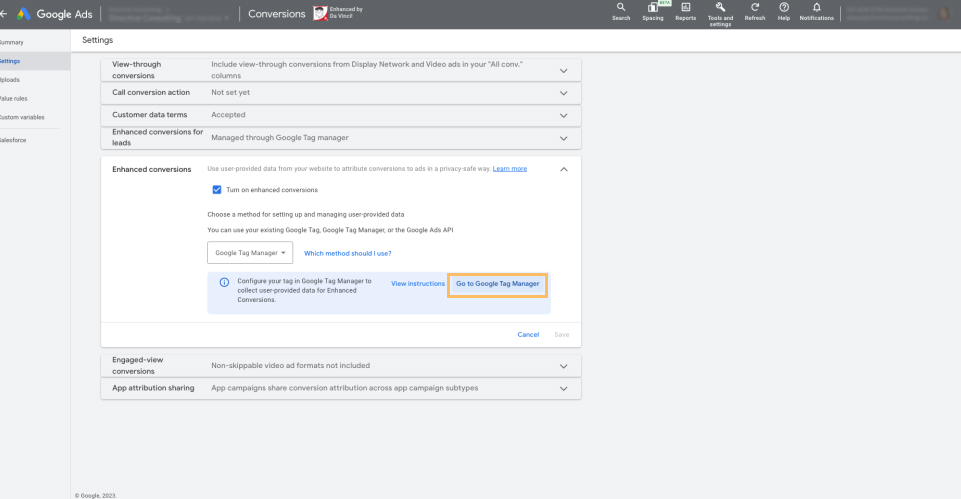
Click “Go to Google Tag Manager”
Completing enhanced conversions for web can be set up in three different ways – automatic collection, code, or manual configuration. This is how to do it by code.
Grab your website developer to help you complete this! Before you start you’ll want to make sure the variables you need like email address, address, and phone number are available on the conversion page where the Google Ads conversion tag fires:
Afterwards, click “Workspace”, and then click on “Tags”.
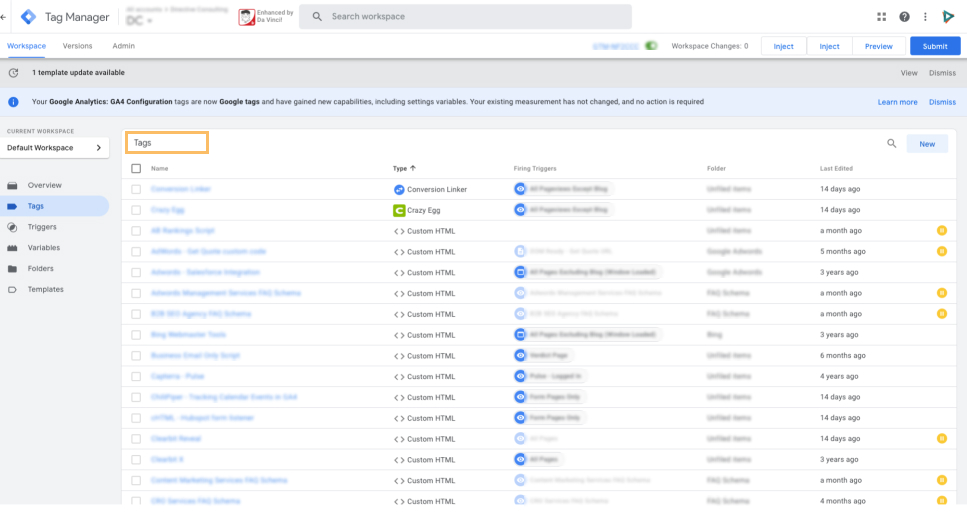
Click on the Google Ads conversion tracking tag you want to implement enhanced conversions with.
Next, click the pencil icon next to “Tag Configuration”.
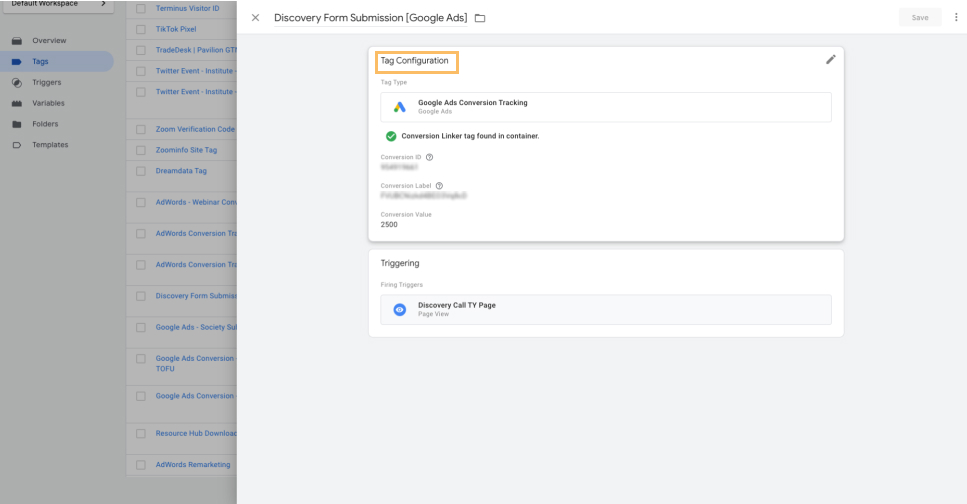
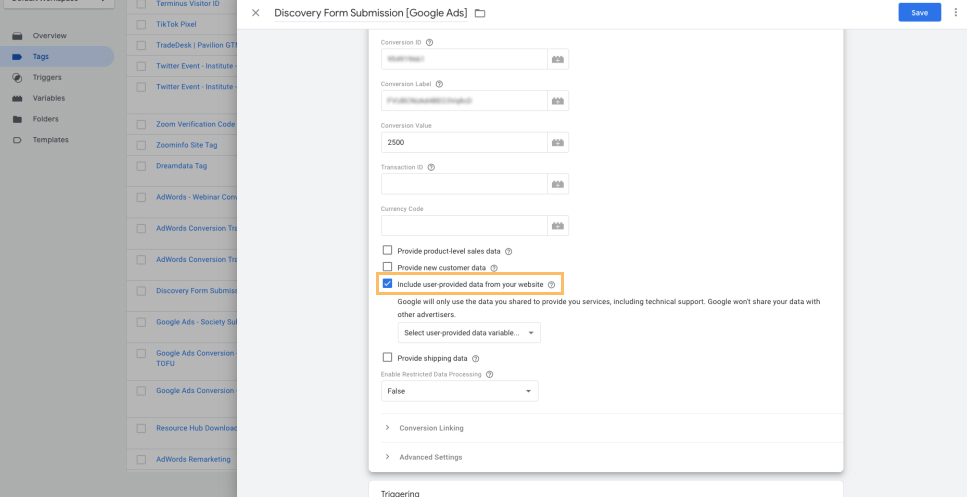
Check off “Include user-provided data from your website”.
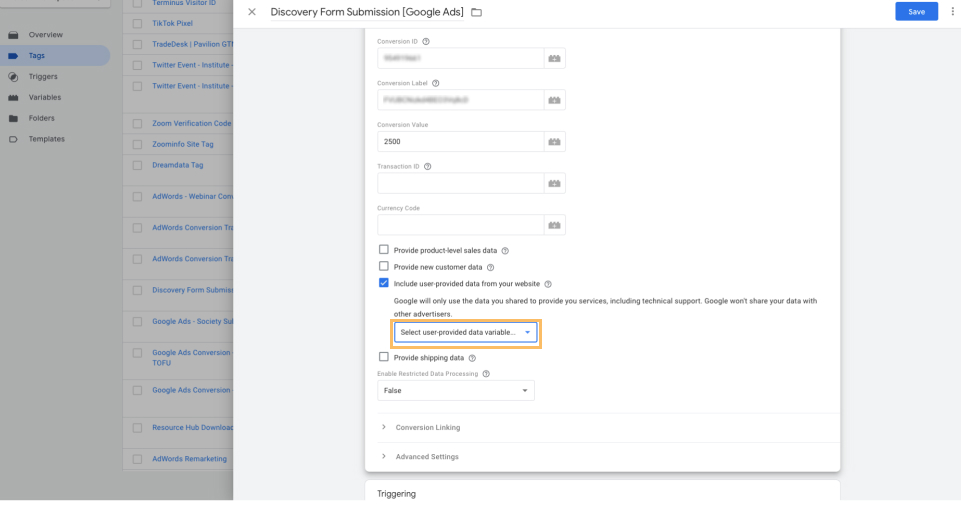
Click the dropdown of “Select user-provided data variable”, then select “New Variable”.
This will open a New Variable. Under “Type” select the “Code” button at the bottom of the list.
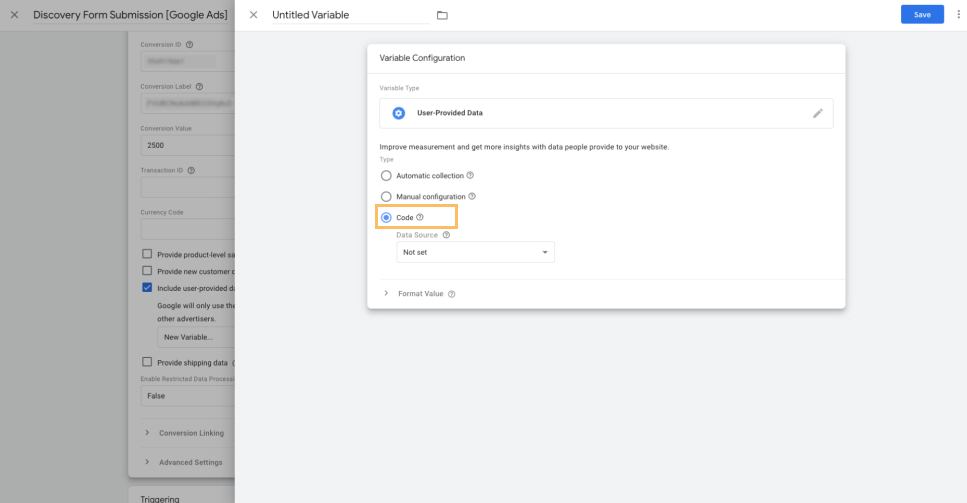
Under Data Source, select “New Variable”. A new variable toggle will open up.
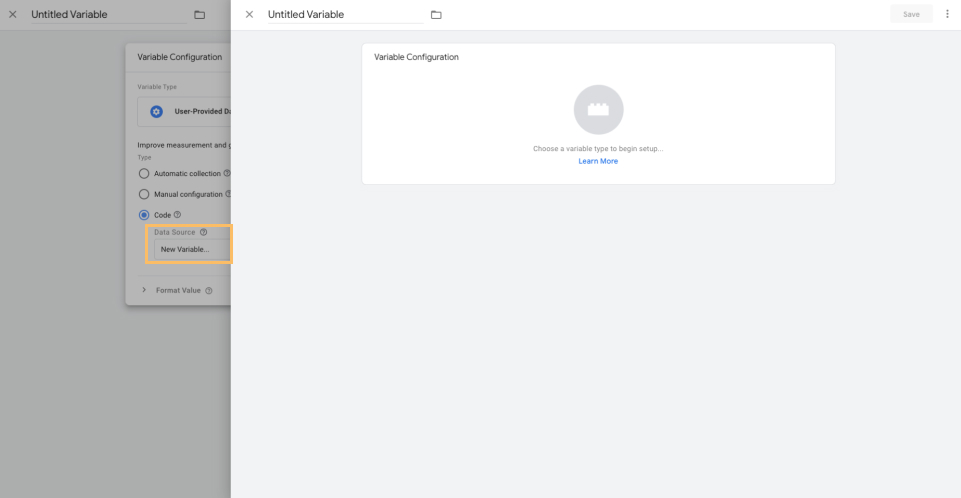
Click the pencil icon in the “Variable Configuration” and select Custom Javascript.
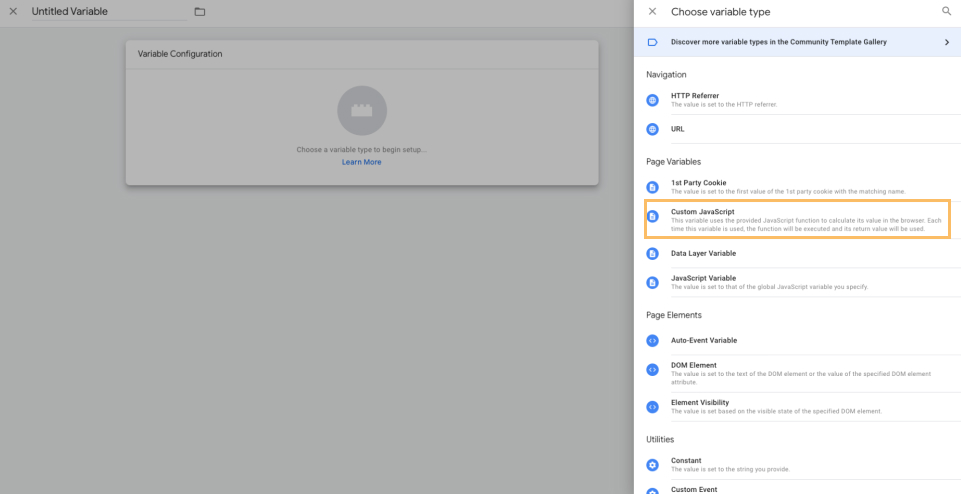
Enter the following code into the custom Javascript variable:
function ()
return
{ "email": yourEmailVariable , // replace yourEmailVariable
with variable name that captures your user’s email "phone_number":
yourPhoneVariable , // repeat for yourPhoneVariable
and following variable names below "address":
{"first_name": yourFirstNameVariable , "last_name":
yourLastNameVariable , "street": yourStreetAddressVariable ,
"city": yourCityVariable , "region": yourRegionVariable ,
"postal_code": yourPostalCodeVariable , "country": yourCountryVariable
}}
}
For each type of customer data in the code above, replace the placeholder variables (for example, yourEmailVariable) with the name of the global javascript variable containing that piece of customer data on your conversion page.
- First name, last name, postal code, and country are all required. At least one of the following fields must be provided:
- Email Address (preferred)
- Address
- A phone number can also be provided as a standalone match key but is recommended to be sent along with an email address.
- Click Save on your two variables and your tag.
Step By Step Guide on How to Implement Enhanced Conversions for Lead:
Completing enhanced conversions for leads can be set up in two different ways – Google Tag Manager or Google Tag. This is how to do it by Google Tag Manager. Grab your website developer to help you complete this! Before you start, you’ll need to identify your website lead forms and pick a field from the form that uniquely identifies your leads. At least one of the following variables must be used when you configure enhanced conversions for leads on your website and when you later import the conversions:
- Email Address (preferred)
- A phone number
Click “New conversion action” in the “Conversions” section.
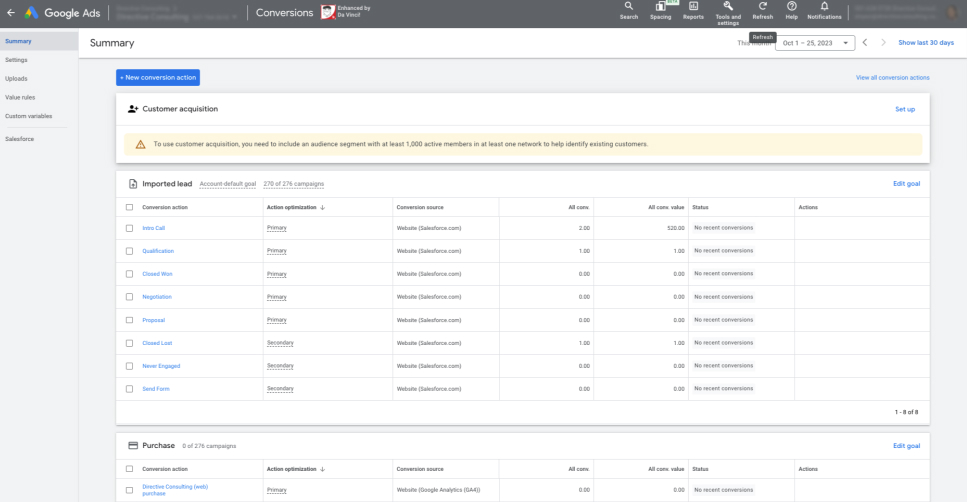
Select “Import”.
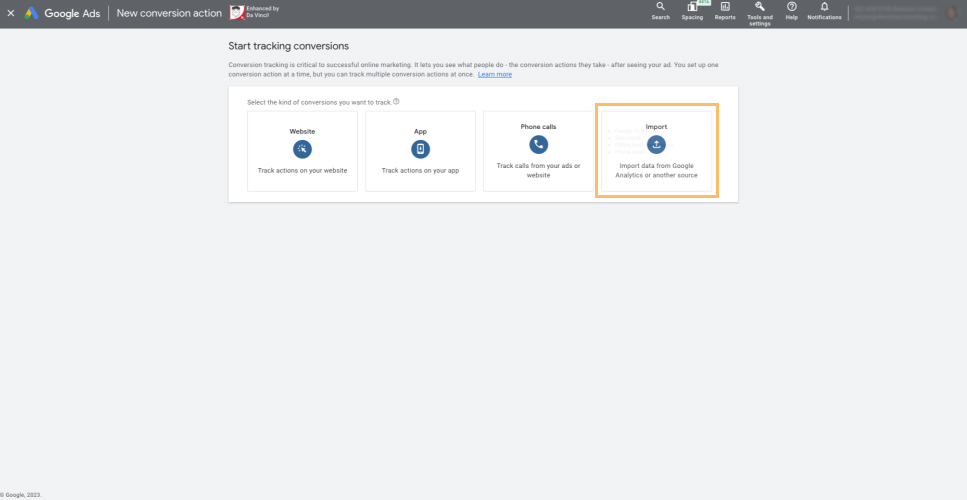
Select “Other data sources or CRMs” and “Track conversions from clicks”, then click “Continue”.

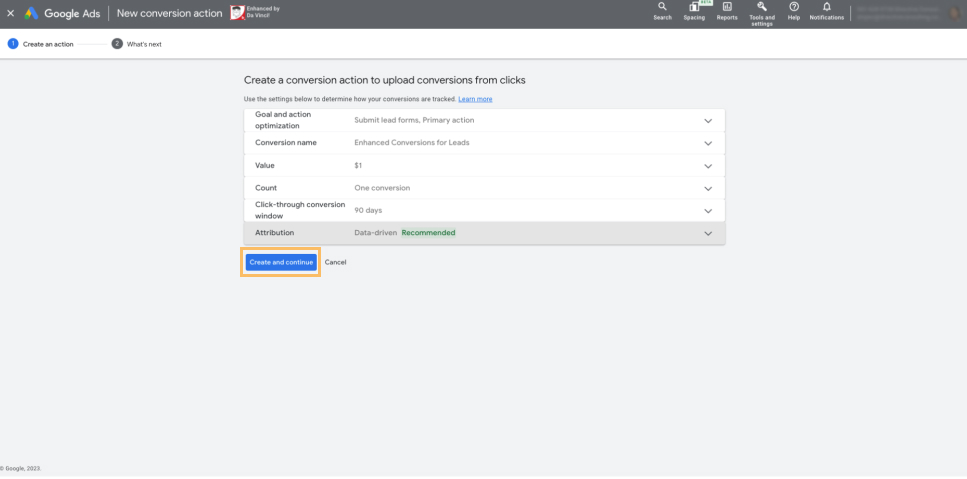
Fill out the conversion action information (goal and action optimization, conversion name, value, count, click-through conversion window, attribution and click “Create and continue” and then Finish.
Go to “Settings” and click on “Enhanced Conversions for leads”.
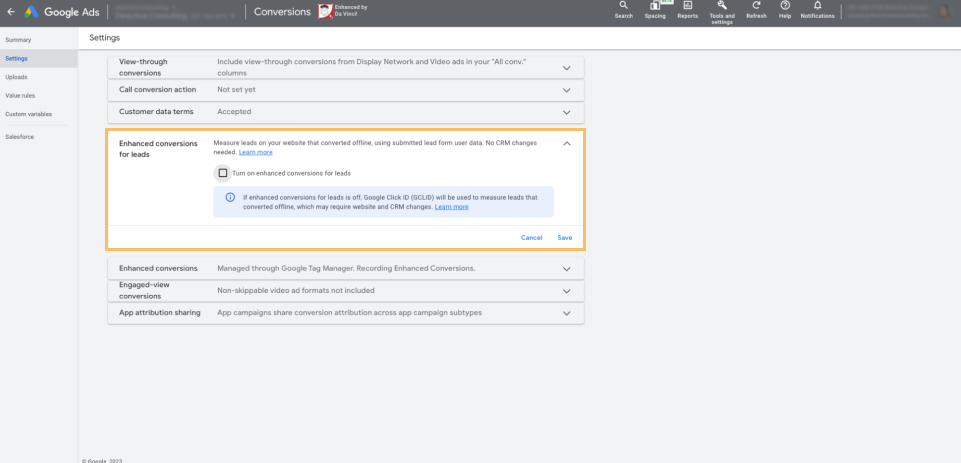
Select “Turn on enhanced conversions for leads and select Google Tag Manager in the drop down.
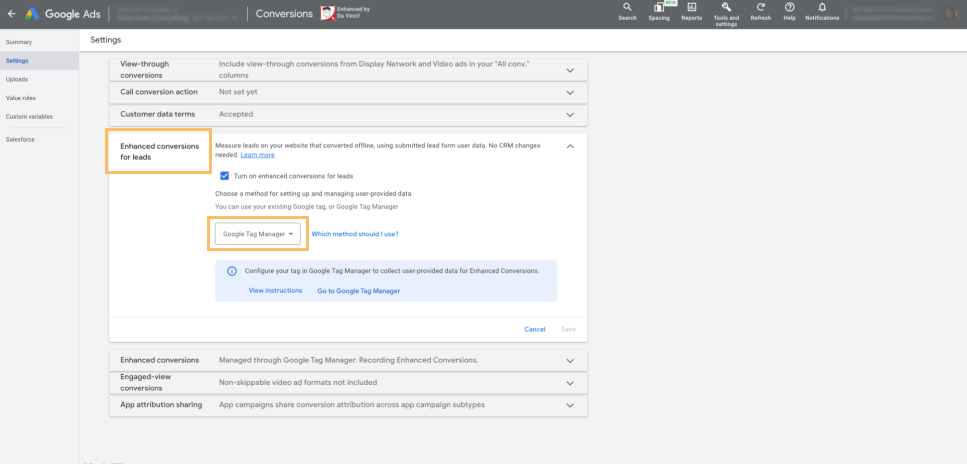
Click “Go to Google Tag Manager”.
You’ll need to make sure you have read and accepted the customer data terms which will only show for the manager account.
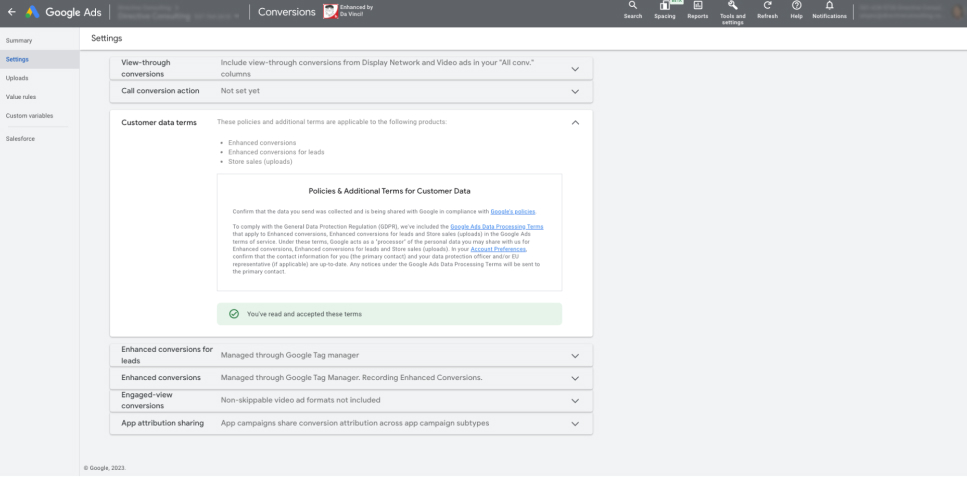
Select View Terms next to “Customer data terms” and read the “Policies and Additional Terms for Customer Data”.
Click the checkbox beside “I have read and accept the terms on behalf of my company”.
Click Agree. Your status will appear as “Accepted”.
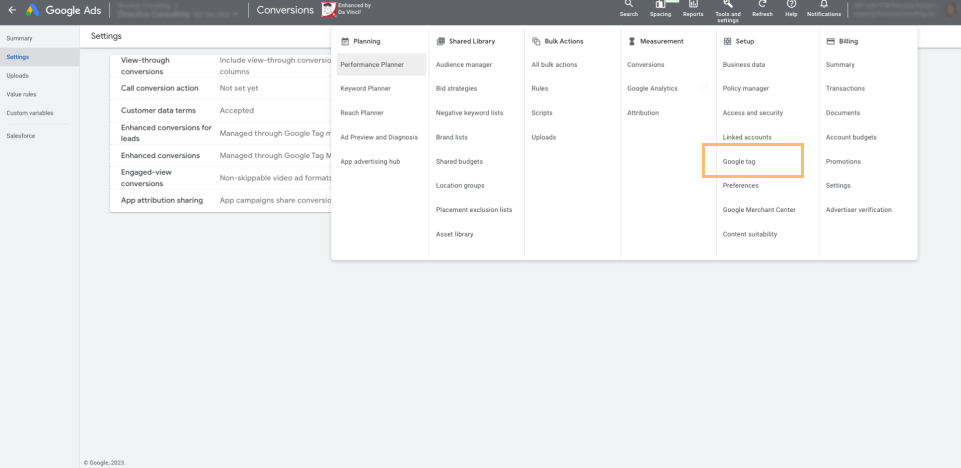
Next you’ll need to adjust the Google tag: Go to “Tools & Settings” and click “Google Tag” under “Set Up”.
Click “Manage automatic event detection” and turn on the “Form interactions” toggle.
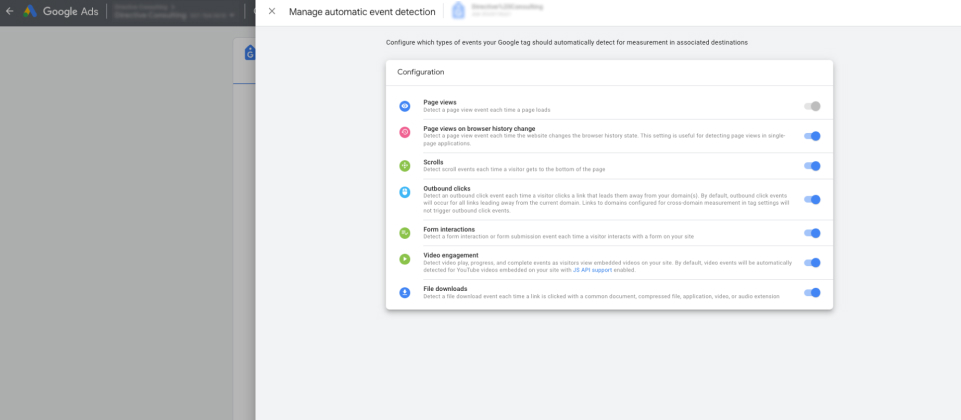
Close the menu.
Open Google Tag Manager” and click “Tags” and then “New”.
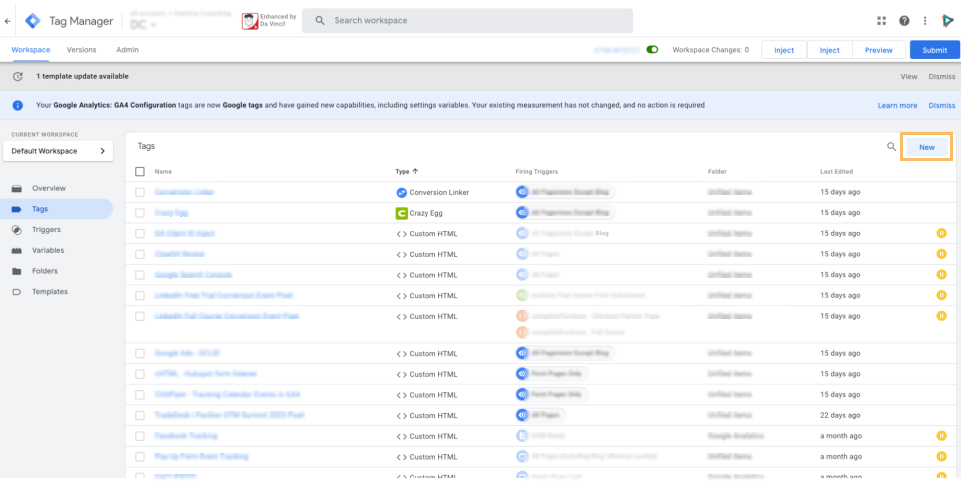
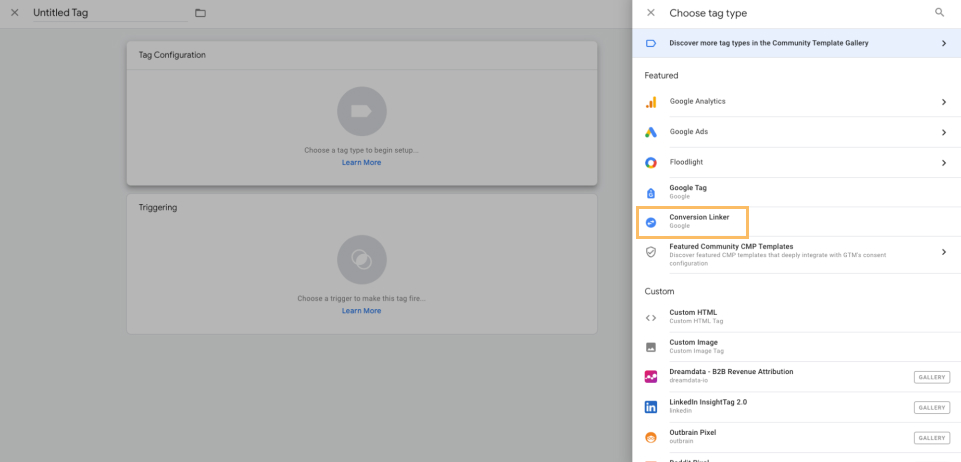
Click the pencil icon for “Tag Configuration” and select Conversion Linker.
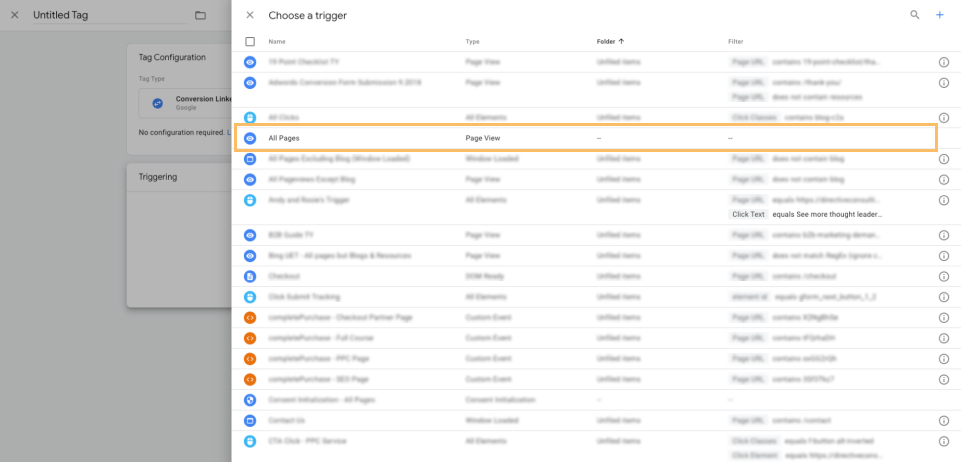
Click the pencil icon next to “Triggering”. In most cases, you should use a trigger that fires on all page views, or on specific page views where site visitors will land after an ad is clicked.
Save and publish your tag configuration.
Repeat the steps to set up the tag and variable logic that were done in web!
How to Validate Your Implementation for Enhanced Conversions
Validate your implementation using Chrome Developer Tools for Enhanced Conversions for Web
- Right-click on your web page and select “Inspect”.
- Select “Network on the right-hand side.
- Enter “Google” in the search bar.
- Find the network request that’s going to “googleadservices.com/pagead/conversion/” (or “google.com/pagead/1p-conversion/” on some browsers).
- Click Payload to view the list of query string parameters.
- Look for a parameter “em” with a hashed string as the value. The value should start with “tv.1~em” followed by a long string of characters. If you see the “em” parameter, this means that the enhanced conversions tag is picking up and hashing the enhanced_conversion_data object.
Validate your tag setup using Preview mode for Enhanced Conversions for Leads
- In your Tag Manager workspace, click the Preview button at the top. A new tab opens with Tag Assistant.
- Enter your website’s URL in Tag Assistant. Tag Assistant opens your website and the Tag Assistant summary. Keep both tabs open.
- On your website, fill out your form.
- Check the “Tag Assistant” summary. Your Google Ads User-Provided Data Event tag should be listed under the “Tags Fired” section in the summary.
- If your tag is listed under “Tags Not Fired”, you need to adjust the tag’s trigger settings.
- Click on the tag to see which values were passed to the tag. Check if your input was received. If the tag did not receive any input:
- Verify your implementation method
- If another tag fires before the Google Ads User-Provided Data Event tag, edit the “Form Submission” trigger. Set the “Wait for Tags” option.
Best Practices and Tips
Grab your developer
If you aren’t good with code or JavaScript, it’s best to bring your web developer to add in the appropriate javascript you need with the variables just to ensure all the information is captured correctly!
When in doubt, talk to Google
Google has a team of implementation specialists who will work with advertisers on the spot to whip up the script, help you navigate adding the script to your site, and testing things to make sure it’s all working how it should. Reach out to your rep to get a call scheduled with them.
Test it out
Don’t just set it up and assume it’s working. Test it to validate your hard work.
Now, go set up enhanced conversions!
Now that you know the why and how to set up enhanced conversions, you won’t have to worry about the accuracy of your conversion measurement dropping off. Ready to take the next step? As PPC Consultants for SaaS, we take your campaigns to the next level. Book a discovery call and position your company at the forefront of your industry.
-
evan
Did you enjoy this article?
Share it with someone!

